
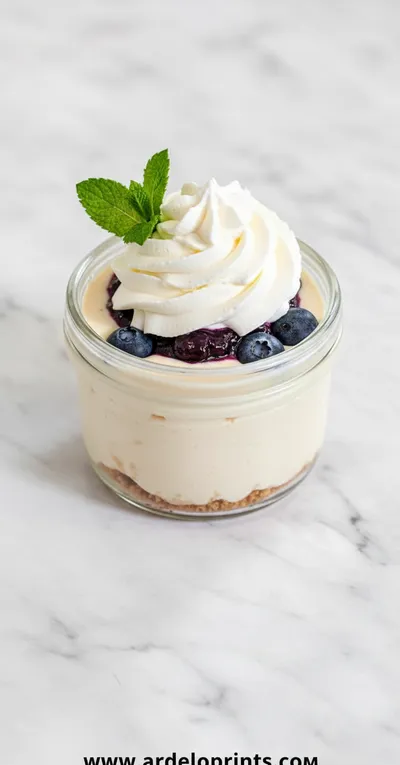
The concept of cheesecake dates back to ancient Greece, where it was served to athletes during the first Olympic Games as a source of energy and strength. This modern version reimagines that tradition with a focus on protein-rich ingredients, creating a dessert that nourishes as it delights. The individual jar presentation makes it perfect for portion control and on-the-go enjoyment, combining historical roots with contemporary health consciousness.
Why You'll Love It
-
Incredibly creamy texture that feels decadent
-
Packed with protein to keep you full and satisfied
-
Perfectly portioned for easy grab-and-go snacks
-
No baking required – just mix and chill
-
Endlessly customizable with your favorite flavors
"My whole family adores these! So creamy and satisfying without the guilt. We make them weekly now."
Essential Ingredient Guide
- Greek Yogurt: Provides the creamy base and a major protein boost. Use full-fat for the richest texture, or low-fat if you prefer. Make sure it's plain and well-stirred.
- Cream Cheese: Gives that classic, tangy cheesecake flavor and lush consistency. Bringing it to room temperature first is key for a smooth, lump-free mixture.
- Protein Powder: The star of the 'high-protein' claim. A vanilla or unflavored whey or plant-based powder works best. It sweetens and thickens the filling.
- Graham Cracker Crumbs: Creates the essential crunchy base. You can buy them pre-crushed or crush your own crackers for a fresher taste.
- Lemon Juice: A small splash brightens all the flavors and cuts through the richness, making the cheesecake taste fresher and less heavy.
- Honey or Maple Syrup: Adds natural sweetness. The amount can be adjusted based on your taste and the sweetness of your protein powder.
 Desserts
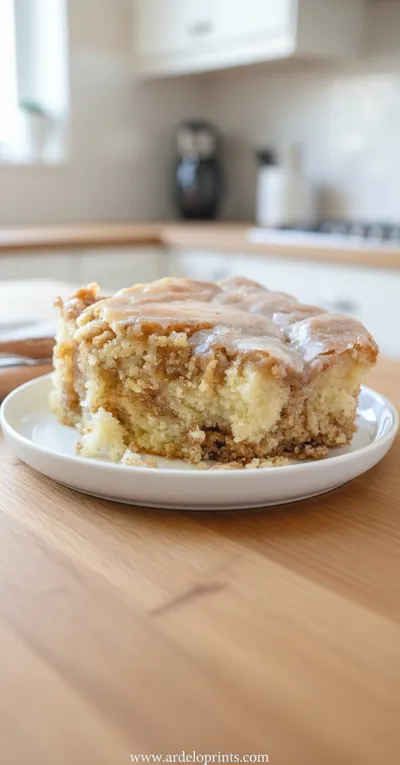
Cinnamon Roll Cake Recipe
Fluffy cinnamon roll cake with caramelized swirl, ideal for breakfast or snack.
Complete Cooking Process
-
Ingredient Readiness:
Let the cream cheese sit out until it's soft to the touch. This is the most important step for a silky, non-lumpy filling. Honestly, if you try to mix it cold, you'll end up with little bits, and it's just... ugh. So, patience here.
-
Flavor Development:
The flavors really meld and deepen as the jars chill in the refrigerator. The tang from the cream cheese and yogurt settles in, the sweetness rounds out, and it all becomes one harmonious taste. It's like it needs that quiet time to become its best self.
-
Texture Control:
Whipping the cream cheese and yogurt together until completely smooth is what gives you that dreamy, cloud-like texture. And pressing the graham cracker base firmly into the jar ensures you get a satisfying crunch with every bite.
-
Finishing Touches:
A little sprinkle of extra graham crumbs or a few berries on top just before serving makes it look pretty and adds a final textural contrast. It's those little touches, you know?
-
Serving Timing:
These are best served chilled, straight from the fridge. The filling firms up perfectly, making it sliceable with a spoon. They're ideal for making ahead, as they keep wonderfully for days.
-
Use a hand mixer for the smoothest filling – it makes all the difference.
-
Taste the mixture before dividing it into jars to adjust sweetness.
-
For a neater look, use a small glass to firmly press the crust down.
-
Chill for at least 4 hours, but overnight is truly best for flavor.
Pro Tips
I mean, these tips really do help. The hand mixer, especially. It just gets everything so airy and light, unlike stirring by hand which can leave it a bit dense. And giving it that full night to chill... well, it's worth the wait. The texture becomes absolutely perfect, like a proper cheesecake. Look, it's a simple recipe, but these little things elevate it from good to 'wow, you made this?'
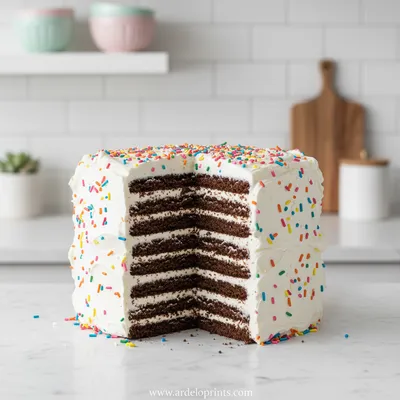 Desserts
Easy Ice Cream Sandwich Cake
Cool, creamy ice cream sandwich cake that's simple, fun, and perfect for any sweet craving.
The essence of the dish:
It's all about that creamy, comforting feeling of cheesecake, but in a light, portion-controlled form you can feel good about eating any time of day. It’s indulgence without the heaviness.
A fun fact or historical angle:
The earliest known cheesecake recipe was recorded by the Greek physician Aegimus in the 5th century BC. He wrote a whole book on the art of making cheesecake!
Flavor or sensory focus:
You'll notice the smooth, cool creaminess first, followed by the gentle tang, a hint of vanilla, and the sweet, crunchy base. It's a really satisfying mix of sensations.
You Must Know
-
Room temperature cream cheese is non-negotiable for smoothness.
-
Chilling time is crucial for the right set – don't skip it!
-
The protein powder you choose will majorly influence the final taste.
Frequently Asked Questions
→ Can I use a different type of yogurt?
Yes, though Greek yogurt is ideal for its thickness and high protein. Regular plain yogurt will work but will result in a softer, less thick filling. You could strain it through a cheesecloth for a few hours to thicken it up first.
→ What can I use instead of graham crackers?
Absolutely. Crushed digestive biscuits, vanilla wafers, or even cinnamon raisin bread crumbs that have been dried out in the oven would be lovely. For a gluten-free option, use gluten-free cookies or nuts.
→ How long do these cheesecake jars last in the fridge?
They keep beautifully for up to 4-5 days when covered tightly. The crust might soften a bit over time, but they're still delicious. They're perfect for meal prep at the beginning of the week.
→ Can I make these dairy-free?
You can! Use a dairy-free cream cheese alternative and a plant-based yogurt (like coconut or almond milk yogurt). Just be aware the flavor and texture profile will be different, but still tasty.
→ My mixture is too thin. What happened?
This usually means the yogurt was too runny or the cream cheese wasn't thick enough. Next time, try a thicker Greek yogurt or add a bit more protein powder to help thicken it. You can also pop the mixed filling into the freezer for 15-20 minutes to firm up slightly before layering.
→ Can I freeze these cheesecake jars?
Yes, they freeze quite well for up to a month. Thaw in the refrigerator overnight before serving. The texture will be slightly different – a bit more icy – but still good. It's a great way to have a healthy treat on hand.
Nutrition Facts
per serving
280
Calories
18g
Protein
22g
Carbs
14g
Fat
Taste Profile
Creamy and sweet with a pleasant tang, balanced and not overly rich.
Ingredient Substitutions
Don't have an ingredient? Try these alternatives
The flavor will change slightly, but the textural purpose remains the same.
Adjust to your preferred level of sweetness.
Provides a similar binding effect and a subtle coconut flavor.
Recipe Variations
Try these delicious twists on the original
Chocolate Lover's
Add 2 tablespoons of cocoa powder to the filling and use chocolate protein powder. For the crust, use crushed oreo cookies (filling removed).
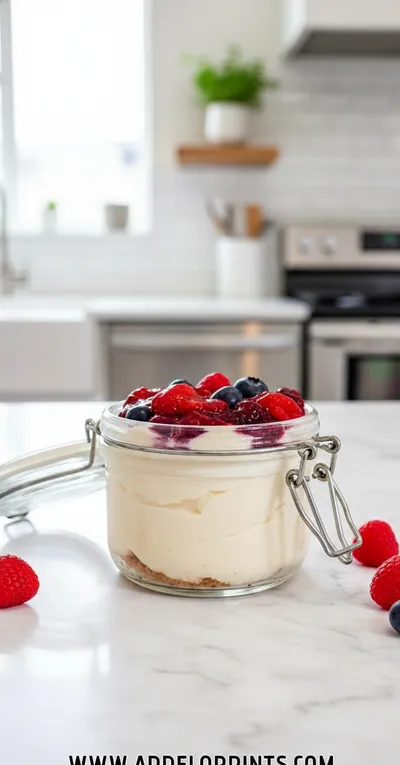
Lemon Berry Bliss
Increase lemon juice to 2 tablespoons and add lemon zest. Swirl in a couple tablespoons of mashed raspberries or apple cinnamon compote before chilling.
Peanut Butter Cup
Swirl 2 tablespoons of peanut butter into the filling and use a crust made from crushed peanut butter cookies. Top with a few chocolate chips.
Common Mistakes to Avoid
Learn from others' mistakes for perfect results
- Using cold cream cheese results in a lumpy, uneven filling.
- Not pressing the crust down firmly enough, causing it to fall apart.
- Not tasting the mixture before dividing, leading to a dessert that's too sweet or not sweet enough.
- Skimping on chilling time, resulting in a filling that's too soft.
Meal Prep & Storage
Make Ahead Tips
This recipe is ideal for making ahead. Prepare the jars completely and store them covered in the refrigerator for up to 5 days. The flavors improve over the first 24 hours.
Leftover Ideas
Leftovers keep well in the fridge. The crust will continue to soften but is still enjoyable. Stir gently before eating if separation occurs (rare).
Perfect Pairings
Serve this with...
Cooking Timeline
Prepare the crust mixture and press into jars.
Beat cream cheese until smooth, then mix in all filling ingredients until fully combined.
Divide filling among jars, smooth tops, and cover.
Chill in refrigerator for a minimum of 4 hours to set.
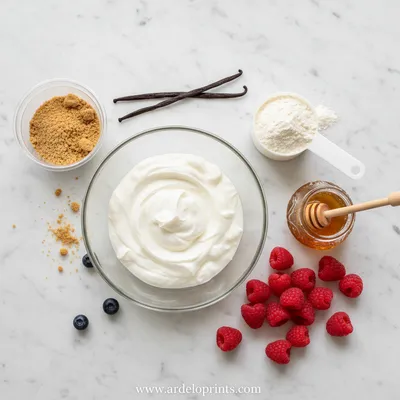
Easy High Protein Cheesecake Jars Recipe
Create perfectly portioned, creamy cheesecake jars packed with protein for a satisfying dessert or snack that feels indulgent yet nourishing.
Timing
Prep Time
15 Minutes
Cook Time
0 Minutes
Total Time
4 Hours 15 Minutes (includes chilling)
Recipe Details
Ingredients
For the Crust
-
01
3/4 cup graham cracker crumbs
-
02
2 tablespoons melted butter or coconut oil
-
03
1 tablespoon honey or maple syrup
For the Filling
-
01
8 oz (225g) cream cheese, softened to room temperature
-
02
1 cup plain Greek yogurt
-
03
1/3 cup vanilla or unflavored protein powder
-
04
3 tablespoons honey or maple syrup, or to taste
-
05
1 teaspoon vanilla extract
-
06
1 tablespoon fresh lemon juice
-
07
A pinch of salt
Instructions
In a small bowl, mix the graham cracker crumbs with the melted butter and 1 tablespoon of honey. Honestly, just stir it with a fork until it looks like wet sand and holds together when you pinch it.
Divide the crust mixture evenly among 4 small jars or glasses (about ½ cup capacity). Press it down firmly with the back of a spoon or a small glass to create a compact base. Yeah, really press it – this gives you a good solid crunch.
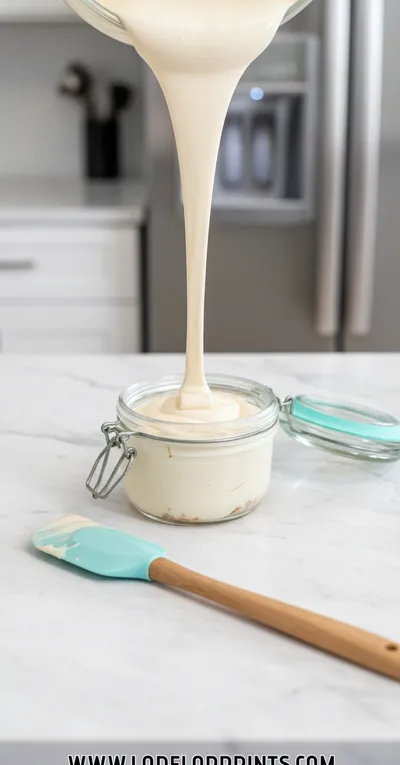
In a medium bowl, using a hand mixer or a whisk, beat the softened cream cheese until it's completely smooth and creamy. No lumps! This is the most important part for the texture.
Add the Greek yogurt, protein powder, 3 tablespoons of honey, vanilla extract, lemon juice, and salt to the cream cheese. Beat everything together until it's perfectly smooth and well combined. Taste it and add a bit more sweetener if you like.
Spoon the cheesecake filling over the crust in each jar, smoothing the tops. You can leave it simple or add a little swirl with the back of your spoon.
Cover the jars and refrigerate for at least 4 hours, but ideally overnight. This chilling time is what makes it set up properly and lets the flavors meld together beautifully, just like a classic banana bread needs its time in the oven.
When you're ready to serve, top with a sprinkle of leftover graham cracker crumbs, a few berries, or a drizzle of honey. Serve cold and enjoy your perfectly portioned treat!
Notes & Tips
-
1
These jars are perfect for meal prep – make them on a Sunday for healthy snacks all week.
-
2
If your protein powder is very sweet, you may want to reduce the added honey. Always taste as you go.
-
3
For a richer flavor, you can lightly toast the graham cracker crumbs in a dry pan before making the crust.
 Snacks
Chocolate Coconut Energy Balls Recipe
Healthy no-bake snacks combining rich chocolate flavor with coconut goodness for quick energy boosts.
Tools You'll Need
-
4 small jars or ramekins (about ½ cup size)
-
Mixing bowls
-
Hand mixer or a sturdy whisk
-
Measuring cups and spoons
-
Spatula
Must-Know Tips
-
Cream cheese must be room temperature – cold cream cheese will leave lumps in your filling.
-
Press the crust down firmly so it doesn't crumble when you scoop into it.
-
Chill for the full time – patience rewards you with the perfect cheesecake texture.
Professional Secrets
-
A pinch of salt enhances all the sweet flavors and balances the tang.
-
Scrape down the sides of the bowl often while mixing for a uniformly smooth filling.
-
Using full-fat dairy products creates the most luxurious mouthfeel.

Recipe by
Mason Cole“Sweet cravings are my specialty! I turn sugar, chocolate, and imagination into pure dessert magic.” 🍰✨
Get Delicious Recipes Weekly
Join 25,000+ home cooks getting our best recipes straight to their inbox.
Free forever • No spam • Unsubscribe anytime