
Vanilla ice cream traces its roots back to the very first frozen desserts served to European royalty in the 1600s. The exotic vanilla bean, harvested from orchids in tropical forests, was prized for its fragrant sweetness. Over centuries, cooks refined the technique, moving from icy scraped mixtures to churned custards. Today, the tradition lives on in kitchens worldwide, where a handful of simple ingredients can recreate that historic indulgence without fire or fancy equipment.
Why You'll Love It
-
- No heat required, perfect for hot days
-
- Minimal ingredients, pure vanilla flavor
-
- Quick set time, ready in under an hour
-
- Gentle texture that melts slowly on the tongue
"This ice cream reminded me of childhood summers – simple, creamy, and utterly comforting."
Essential Ingredient Guide
- Heavy Cream: Choose a cream with at least 35% fat for the richest mouthfeel; it carries the vanilla scent beautifully.
- Whole Milk: Whole milk balances the richness of cream while keeping the mixture smooth.
- Vanilla Bean or Pure Extract: A real vanilla bean scraped for seeds gives depth; if using extract, pick one without added sugar.
- Granulated Sugar: Fine sugar dissolves quickly; you can adjust sweetness to taste.
- Salt: A pinch enhances the vanilla flavor and rounds the sweetness.
- Optional: Honey or Maple Syrup: Adds subtle floral notes, but keep the amount low to avoid over‑sweetening.
 Desserts
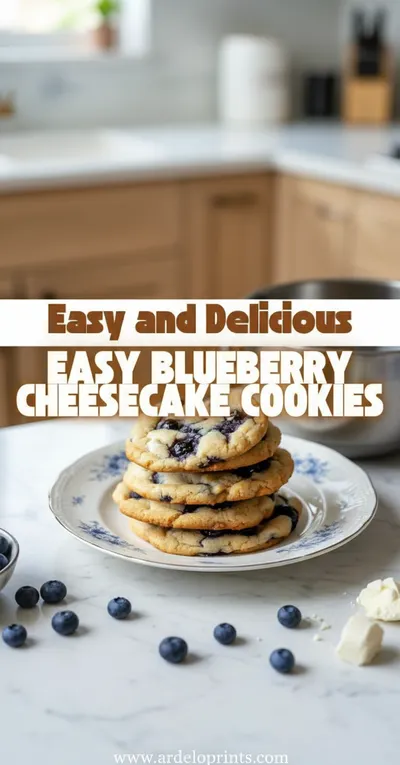
Blueberry Cheesecake Cookies
Buttery cookies with a tender blueberry cheesecake centre, ideal for a cozy treat.
Complete Cooking Process
-
Ingredient Readiness:
Measure and whisk together cream, milk, sugar, and salt until the sugar dissolves; split the vanilla bean and scrape the seeds.
-
Flavor Development:
Stir in the vanilla seeds (or extract) and let the mixture rest for a few minutes, allowing the aroma to bloom.
-
Texture Control:
Chill the base in the refrigerator for at least 30 minutes, then transfer to a freezer‑safe container, stirring every 15 minutes to break ice crystals.
-
Finishing Touches:
When the ice cream is thick but still soft, fold in any optional swirl or garnish, then freeze until firm.
-
Serving Timing:
Allow the scoop to sit at room temperature for two minutes before serving for a perfectly creamy bite.
-
Use a shallow metal pan for faster freezing.
-
Cover the surface with parchment paper to prevent ice crystals.
-
Stir with a wooden spoon for gentle folding.
-
Add a pinch of alcohol‑free vanilla liqueur for extra depth, if desired.
Pro Tips
These small adjustments make a noticeable difference. I often find that the parchment trick keeps the surface silky, and the shallow pan brings the freeze time down to about 45 minutes. Patience is still key, though; each stir helps create that smooth, custard‑like texture we all love.
The essence of the dish:
It’s the simple harmony of cream, milk, and vanilla that creates a lusciously smooth dessert, letting the pure flavor shine.
A fun fact or historical angle:
The first recorded vanilla ice cream was served to the French court in the 1600s, where it was considered a luxurious delicacy.
Flavor or sensory focus:
Expect a buttery, velvety mouthfeel with a fragrant vanilla aroma that lingers gently after each spoonful.
You Must Know
-
Use cold ingredients for quicker freezing.
-
Stir regularly to prevent icy crystals.
-
Serve slightly softened for best texture.
Frequently Asked Questions
→ Can I use almond milk instead of dairy?
Yes, substitute almond milk for the whole milk and keep the same amount of heavy cream, or use a full‑fat coconut milk for a richer texture.
→ How long does it take to freeze?
Approximately 45‑60 minutes, stirring every 15 minutes to keep the texture smooth.
→ Do I need an ice cream maker?
No, a simple freezer container and occasional stirring work just fine.
→ Can I add mix‑ins like chocolate chips?
Add them during the last stirring stage so they stay evenly distributed without melting.
→ Is this recipe suitable for keto?
Swap sugar for a keto‑friendly sweetener like erythritol and keep the dairy components.
→ What can I serve it with?
A warm berry compote, toasted nuts, or a drizzle of caramel makes a lovely accompaniment.
Nutrition Facts
per serving
310
Calories
3g
Protein
12g
Carbs
27g
Fat
Taste Profile
Creamy vanilla sweetness with a delicate richness
Ingredient Substitutions
Don't have an ingredient? Try these alternatives
Provides similar richness; yields a slight coconut undertone.
Use sparingly; adjust for sweetness level.
Recipe Variations
Try these delicious twists on the original
Spicy Version
Add a pinch of ground cinnamon and a dash of chili powder for a subtle warmth.
Mediterranean Style
Fold in crushed pistachios and a drizzle of honey for a nutty finish.
Common Mistakes to Avoid
Learn from others' mistakes for perfect results
- Skipping the regular stirring, which creates icy chunks.
- Using low‑fat milk; it leads to a watery texture.
- Adding mix‑ins too early, causing them to melt.
Meal Prep & Storage
Make Ahead Tips
You can prepare the vanilla base up to 24 hours in advance; keep it refrigerated and give it a quick whisk before freezing.
Leftover Ideas
Reheat gently in a saucepan over low heat, stirring constantly, to melt back into a creamy sauce for desserts.
Perfect Pairings
Serve this with...
Cooking Timeline
Gather and measure all ingredients; whisk cream, milk, sugar, and salt.
Add vanilla seeds, let the mixture rest, then cover and refrigerate.
Chill the base in the fridge until cold.
Freeze in shallow pan, stirring every 15 minutes to break ice crystals.
Add optional mix‑ins, final freeze, then serve.
 Dinner
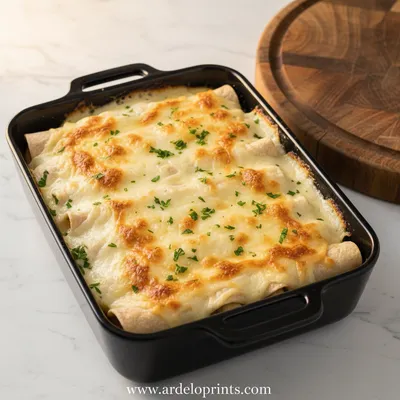
Easy White Chicken Enchiladas with Creamy Sauce
Quick white chicken enchiladas ready in 30 minutes with a luscious creamy sauce.

Homemade Vanilla Ice Cream – No Cooking Required
A silky, dreamy vanilla ice cream that forms without ever touching a burner. I like to think of it as a quiet moment in the kitchen, a sweet pause that feels like a warm hug on a summer evening. no‑cook vanilla ice cream is the perfect treat for any season.
Timing
Prep Time
15 Minutes
Cook Time
0 Minutes
Total Time
1 Hour
Recipe Details
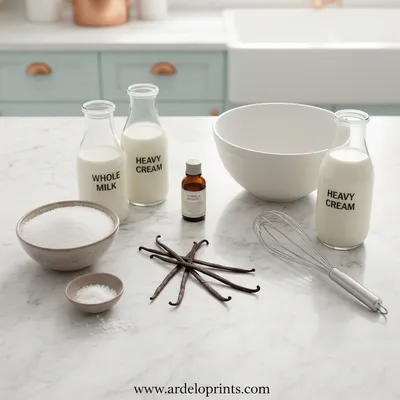
Ingredients
Base
-
01
2 cups heavy cream
-
02
1 cup whole milk
-
03
½ cup granulated sugar
-
04
¼ teaspoon salt
-
05
1 vanilla bean, split and seeds scraped
Optional Add‑ins
-
01
2 tablespoons honey
-
02
½ cup toasted almond slices
Instructions
In a large bowl, whisk together the heavy cream, whole milk, sugar, and salt until the sugar dissolves completely.
Add the scraped vanilla seeds (or 1 teaspoon pure vanilla extract) and stir gently; let the mixture rest for 5 minutes to let the flavor develop.
Cover the bowl and chill the base in the refrigerator for at least 30 minutes, or until thoroughly cold.
Transfer the chilled mixture to a shallow metal pan, cover with parchment paper, and place in the freezer. Every 15 minutes, pull out a spatula and stir vigorously to break up ice crystals.
After about 45 minutes, the ice cream should be thick but still soft; fold in any optional honey or almond slices, then freeze until firm, about 20 more minutes.
Let the ice cream sit at room temperature for 2 minutes before scooping, then serve in chilled bowls.
Notes & Tips
-
1
If the mixture freezes too hard, let it soften a bit before the final stir to keep the texture creamy.
-
2
Using a vanilla bean gives a deeper flavor than extract; you can combine both for extra aroma.
-
3
For a vegan version, replace dairy with coconut cream and almond milk, and use maple syrup as sweetener.
 International_Cuisine
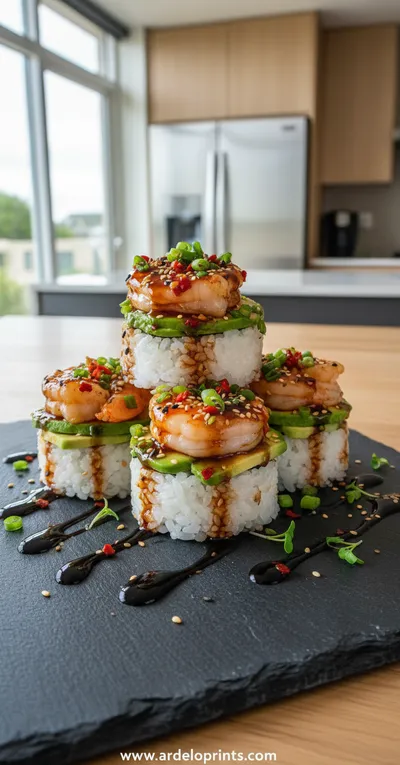
Spicy Shrimp Sushi Stacks
A fresh, vibrant bite combining seasoned shrimp, rice, and crisp toppings.
Tools You'll Need
-
Large mixing bowl
-
Whisk
-
Sharp knife for vanilla bean
-
Shallow metal pan
-
Spatula
-
Parchment paper
Must-Know Tips
-
Keep ingredients cold before mixing; it speeds up the freezing process.
-
Stirring consistently prevents large ice crystals and yields a smoother texture.
-
Taste the base before chilling; adjust sweetness or vanilla intensity now.
Professional Secrets
-
Chill the mixing bowl for extra coldness, ensuring rapid set.
-
Use a metal pan; it conducts cold better than glass.
-
Cover the surface with parchment to stop ice crystals forming.

Recipe by
Mason Cole“Sweet cravings are my specialty! I turn sugar, chocolate, and imagination into pure dessert magic.” 🍰✨
Get Delicious Recipes Weekly
Join 25,000+ home cooks getting our best recipes straight to their inbox.
Free forever • No spam • Unsubscribe anytime