I remember one year, trying to come up with something truly special for the kids' Halloween party. I wanted something cute, a little bit spooky, but mostly, I wanted it to be simple enough that we could make it together. That’s when the idea for these mummy hand pies popped into my head. Puff pastry is such a dream to work with, and that rich, chocolatey filling... wow. Watching those little faces light up when they saw their mummified treats was just the best. It’s become a sweet little tradition now, a moment we look forward to creating every October. It reminds me that the best things are often simple and made with love.
Why You'll Adore These Mummy Hand Pies
-
They are unbelievably fun to make, especially with little helpers in the kitchen!
-
You only need a few simple ingredients for this spooky sweet treat.
-
They're perfect for Halloween parties, cozy autumn evenings, or as a fun school snack.
-
The flaky puff pastry combined with the rich chocolate-hazelnut spread is just heavenly.
-
You can easily make them ahead of time for stress-free party prep.
My kids absolutely adored making these with me! They were so excited about wrapping the 'bandages' and placing the eyes. And the taste? Amazing! So flaky and chocolatey. A new family favorite for sure, and so perfect for Halloween!
Essential Ingredient Guide
- Vegan Puff Pastry: Look for brands that are explicitly labeled vegan (most are, but always check!). Ensure it's fully thawed but still cold enough to work with, otherwise, it can get sticky and hard to handle. Don't rush the thawing process!
- Vegan Chocolate-Hazelnut Spread: There are some wonderful dairy-free alternatives to traditional Nutella now! Brands like Nocciolata Dairy Free or other organic options work beautifully. Its creamy, nutty sweetness is what makes these pies so addictive.
- Plant-Based Milk: Any unsweetened plant-based milk will work for brushing the pastry. It helps the 'bandages' get that beautiful golden sheen as they bake. Almond, soy, or oat milk are all great choices.
- Vegan Candy Eyes: These are essential for giving your mummies their cute, spooky personality! You can find them at most craft stores or online, often in the baking aisle during seasonal times. If you can't find vegan ones, a couple of dots of melted vegan white chocolate with a tiny dark chocolate center can work as a DIY solution.
Birria Tacos: Easy & Flavorful Recipe
Tender, slow-braised beef tacos pan-fried to perfection with a rich, savory consomé for dipping.
Complete Cooking Process
-
Getting Started (Prep & Thaw):
-
Allow your vegan puff pastry to thaw at room temperature. This usually takes about 30-40 minutes. You want it pliable but still cool.
-
Preheat your oven to 400°F (200°C) and line a large baking sheet with parchment paper. This makes cleanup so much easier, trust me.
-
-
Assemble the Mummies:
-
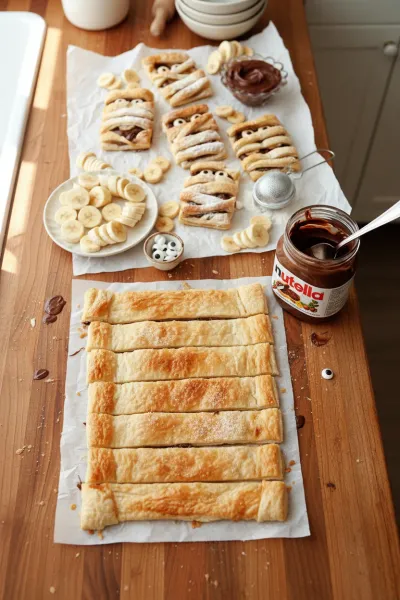
Gently unroll one sheet of pastry. Cut it into 4-5 rectangles or use a cookie cutter for rounds. Repeat with the second sheet, so you have 8-10 bases.
-
On half of these shapes, spoon about 1-2 tablespoons of the vegan chocolate-hazelnut spread. Leave a nice border, we don't want any runaway filling!
-
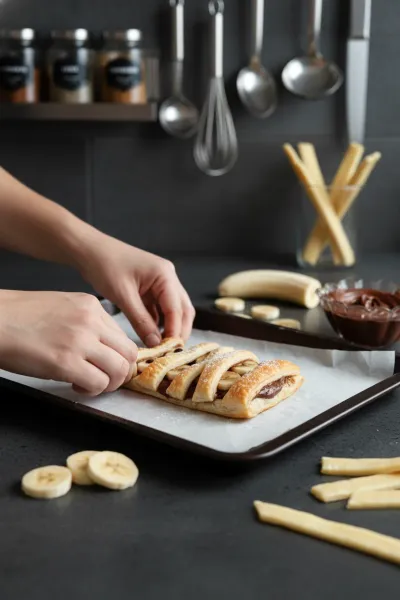
Take the remaining pastry pieces and cut them into thin strips, about 1/4 to 1/2 inch wide. These are your mummy 'bandages.'
-
Place these strips crisscross over the filling, creating that classic mummy look. Remember to leave a small opening for the eyes near the top. Press the ends of the strips gently to seal them to the base.
-
-
Bake to Golden Perfection:
-
Carefully transfer your assembled mummy pies to the prepared baking sheet.
-
Brush the tops of the pastry strips with your chosen plant-based milk. This step is key for that lovely golden brown color.
-
Bake for 12-15 minutes. Watch them closely! They're done when they’re beautifully puffed and golden.
-
Let them cool on the baking sheet for just a few minutes, then transfer to a wire rack.
-
-
The Spooky Finishing Touches:
-
While the pies are still a bit warm, gently press two vegan candy eyes into the open space you left for the 'face' on each mummy. The warmth will help them stick.
-
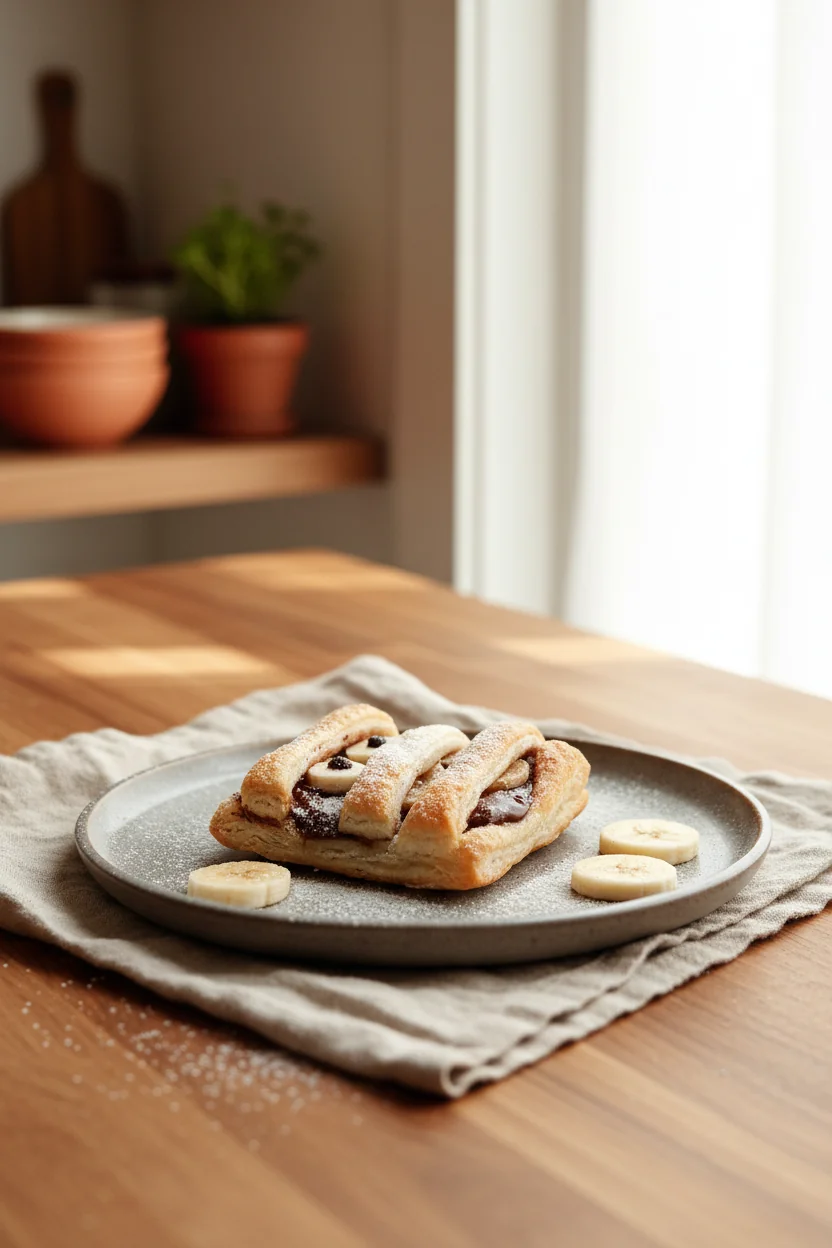
Allow the pies to cool completely before serving. If you're feeling extra fancy, a light dusting of powdered sugar adds a magical, ghostly touch.
-

Easy Skillet Chicken Thighs Recipe
Garlic cream sauce skillet chicken thighs for a delicious and simple weeknight dinner.
Frequently Asked Questions About Mummy Hand Pies
→ Can I use regular Nutella if I'm not vegan?
Absolutely! If dietary restrictions aren't a concern, traditional Nutella works perfectly. Just swap out the vegan chocolate-hazelnut spread for your favorite brand.
→ What if my puff pastry isn't vegan?
Most store-bought puff pastries are accidentally vegan, but it's always best to double-check the ingredient list. Look for brands made with vegetable fats rather than butter.
→ Can I make these ahead of time?
Yes! You can bake the pies a day in advance. Store them in an airtight container at room temperature. Add the candy eyes just before serving for the freshest look. You can also assemble them and freeze before baking, then bake from frozen, adding a few extra minutes to the bake time.
→ What if I can't find candy eyes?
No worries! You can get creative. Use two small white chocolate chips with a tiny dot of melted regular chocolate in the center, or even use small dots of white and black icing to draw eyes on once the pies are cool.
→ Can I use a different filling?
Of course! While the chocolate-hazelnut is a favorite, you could try apple pie filling, cherry pie filling, or even a cream cheese-based filling (if not vegan). Just make sure the filling isn't too runny.
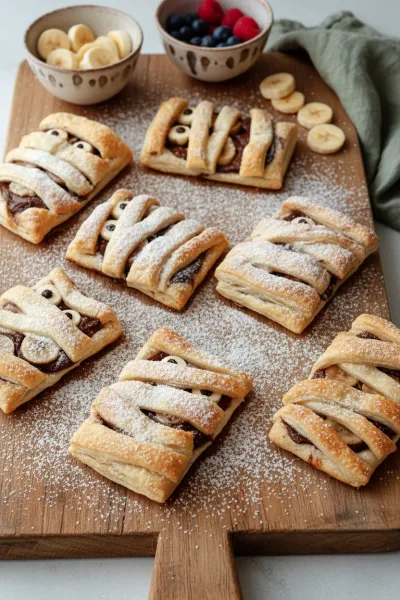

Nutella Mummy Hand Pies
Vegan Nutella mummy hand pies are a fun Halloween treat! Delicious and easy to make with just a few ingredients. A perfect make-ahead dessert!
Timing
Prep Time
20 minutes
Cook Time
15 minutes
Total Time
35 minutes
Recipe Details
Ingredients
For the Mummy Hand Pies
-
01
1 package (14.1 oz/397g) vegan puff pastry, thawed
-
02
1/2 cup vegan chocolate-hazelnut spread (like Nocciolata Dairy Free or other vegan 'Nutella' alternative)
-
03
2 tablespoons unsweetened plant-based milk (almond, soy, or oat)
-
04
1 tablespoon powdered sugar, for dusting (optional)
For Decorating
-
01
16-20 small vegan candy eyes (or two per pie)
Instructions
Thaw the vegan puff pastry according to package directions, usually 30-40 minutes at room temperature. Preheat your oven to 400°F (200°C) and line a baking sheet with parchment paper.
Gently unroll one sheet of puff pastry onto a lightly floured surface or parchment paper. Cut the sheet into 4-5 rectangles (or use a round cookie cutter if you prefer). Repeat with the second sheet, so you have 8-10 pastry bases.
On half of your pastry rectangles, place about 1-2 tablespoons of vegan chocolate-hazelnut spread in the center, leaving a small border around the edges. Try not to overfill, hon.
Take the remaining puff pastry rectangles. Using a sharp knife or pizza cutter, cut them into thin strips, about 1/4 to 1/2 inch wide. These will be your mummy bandages!
Carefully place the strips over the chocolate-hazelnut spread rectangles, creating a mummy-like crisscross pattern. Leave a small gap near the top for the 'eyes'. Gently press the ends of the strips onto the bottom pastry to seal them.
Transfer the assembled mummy pies to your prepared baking sheet. Brush the tops of the pastry strips with plant-based milk. This will give them a lovely golden finish.
Bake for 12-15 minutes, or until the puff pastry is golden brown and puffed up. Keep an eye on them, ovens can be tricky sometimes!
Remove the hand pies from the oven and let them cool on the baking sheet for a few minutes. While still warm, carefully place two vegan candy eyes into the 'face' gap on each mummy. The warmth helps them stick.
Let them cool completely on a wire rack. For an extra touch, dust lightly with powdered sugar before serving. Happy haunting!
Notes & Tips
-
1
Make sure your oven is fully preheated for optimal puff pastry results.
-
2
If you have trouble with the candy eyes sticking, a tiny dab of melted vegan chocolate or icing on the back will do the trick.
-
3
Don't worry if your 'bandages' aren't perfectly straight; the charm of mummies is in their slightly disheveled look!
-
4
You can also use a small glass or cookie cutter to cut round shapes instead of rectangles.
-
5
A bit of extra powdered sugar after cooling makes them look extra spooky and sweet.
Easy Slow Cooker Pot Roast
The ultimate set-it-and-forget-it meal. Tender beef and hearty vegetables simmered to perfection in the slow cooker.
Tools You'll Need
-
Large baking sheet
-
Parchment paper
-
Sharp knife or pizza cutter
-
Measuring spoons
-
Small bowl for plant milk
-
Pastry brush
-
Wire cooling rack
Must-Know Tips
-
Ensure puff pastry is thawed but still cold enough to handle; it becomes sticky if too warm.
-
Don't overfill the pies, or the filling might ooze out during baking.
-
Brush with plant-based milk for a beautiful golden crust – it really makes a difference!
-
Place the candy eyes on while the pies are still slightly warm so they stick well.
-
These are best served fresh, but leftovers are still delicious for a day or two.
Professional Secrets
-
For extra flakiness, chill the assembled pies for 15 minutes before baking. It helps the butter layers in the pastry firm up.
-
If you want a hint of spice, sprinkle a tiny pinch of cinnamon into your chocolate-hazelnut spread.
-
Score the 'bandages' lightly with a knife before baking to give them more definition and make them look even more like fabric strips.
-
A tiny drop of edible glue or royal icing can help secure those candy eyes if your pies cool too much before decorating.
-
Experiment with different shapes! Use a ghost or pumpkin cookie cutter for more variety.

Recipe by
Mason Cole“Sweet cravings are my specialty! I turn sugar, chocolate, and imagination into pure dessert magic.” 🍰✨
Get Delicious Recipes Weekly
Join 25,000+ home cooks getting our best recipes straight to their inbox.
Free forever • No spam • Unsubscribe anytime