
No‑bake cheesecakes have a long history of easing the need for ovens, originating as a clever solution for dessert lovers in warm climates. When the Oreo was introduced in the 1940s, its crisp chocolate cookie quickly became a favorite for layers and crusts. Combining these two simple pleasures yields a timeless treat that celebrates both convenience and comfort.
Why You'll Love It
-
- No oven needed, perfect for hot days
-
- Creamy texture balanced by crunchy cookie crumbs
-
- Easy to scale for parties or quiet evenings
-
- Looks elegant in a cup, yet feels homey
"These little cups are my new go‑to for anytime cravings – they melt in the mouth and look adorable!"
Essential Ingredient Guide
- Oreo cookies: Choose fresh, full‑size cookies; they give the best crunch and chocolate flavor.
- Cream cheese: Full‑fat cheese provides smooth richness; allow it to soften for easier mixing.
- Powdered sugar: Adds sweetness without grainy texture; sift before adding.
- Vanilla extract: A few drops deepen the aromatic profile, tying the chocolate and cream together.
- Heavy cream: Lightly whipped, it lightens the filling while keeping it luxurious.
- Butter: Melted butter binds the crust; use unsalted for better flavor control.
 Desserts
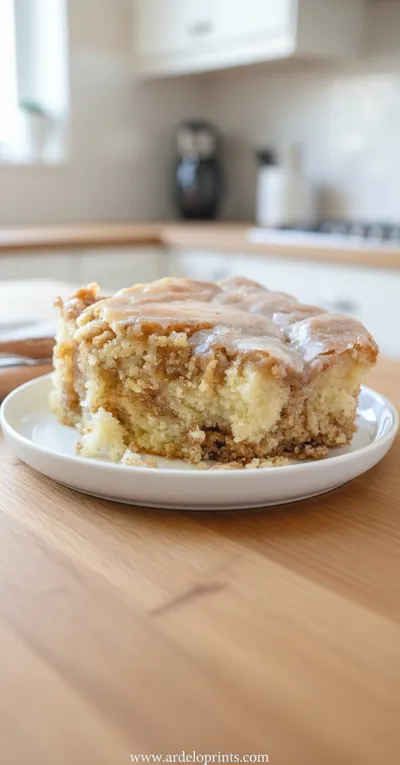
Cinnamon Roll Cake Recipe
Fluffy cinnamon roll cake with caramelized swirl, ideal for breakfast or snack.
Complete Cooking Process
-
Ingredient Readiness:
Gather all cookies, soften the cream cheese, and melt the butter; this keeps the rhythm smooth.
-
Flavor Development:
Crush the cookies and blend with butter; toast lightly in the pantry to release their chocolate aroma.
-
Texture Control:
Whisk cream cheese, sugar, and vanilla until silky; fold in whipped cream for a feather‑light lift.
-
Finishing Touches:
Layer crust and filling in cups, then chill until set; garnish with a whole Oreo or a dusting of cocoa.
-
Serving Timing:
Serve after at least two hours in the fridge; the cooler temperature keeps the filling firm and refreshing.
-
Use a food processor for an even cookie crust without extra work.
-
Let the cream cheese sit at room temperature for 15 minutes; it mixes smoother.
-
Add a pinch of sea salt to the filling to heighten the chocolate sweetness.
-
Top each cup with a mini Oreo for a decorative finish.
Pro Tips
I find the little pauses while the cups chill in the fridge the best time to reflect on the simple pleasure of dessert. It's a moment when the kitchen quiets down, and the scent of chocolate lingers in the air, reminding you that comfort can be assembled in a handful of steps. So, when you finally pull the cups out, let the coolness surprise you, and enjoy each bite slowly, letting the flavors unfold like a familiar story.
 Desserts
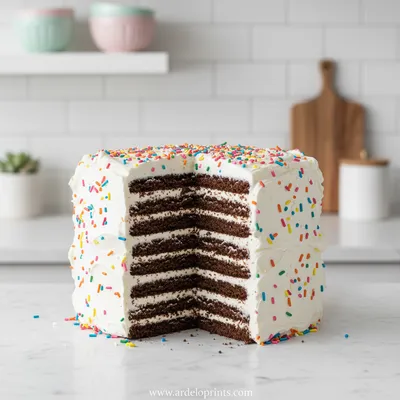
Easy Ice Cream Sandwich Cake
Cool, creamy ice cream sandwich cake that's simple, fun, and perfect for any sweet craving.
The essence of the dish:
A harmonious blend of buttery Oreo crumbs and velvety cheesecake, each cup offers a creamy bite crowned with a crisp chocolate edge.
A fun fact or historical angle:
The Oreo was originally marketed as an “offering of an overjoyed chocolate loving public”, and its cookie‑sandwich structure inspired countless dessert bases, including this no‑bake cup.
Flavor or sensory focus:
Expect an initial chocolate crunch that quickly gives way to a smooth, slightly tangy cream, finished with a whisper of vanilla and a cool, buttery background.
You Must Know
-
Keep the cups chilled right up to serving.
-
Do not over‑mix the filling; it should stay light.
-
Store leftovers in an airtight container for up to three days.
Frequently Asked Questions
→ Can I make these ahead of time?
Yes, you can prepare the cups up to 24 hours ahead; just keep them covered in the fridge.
→ What can I use instead of cream cheese?
A mixture of Greek yogurt and softened goat cheese works, but the texture will be slightly tangier.
→ Do I need to bake the crust?
No, the butter melts the crumbs together; a brief toast in a dry pan adds a subtle aroma if you like.
→ How do I keep the cups from getting soggy?
Ensure the crust is fully set before adding the filling and keep the cups sealed tightly.
→ Can I add a fruit layer?
A thin layer of raspberry puree adds a bright contrast, just spread it over the crust before the cheesecake.
→ Is this recipe gluten‑free?
Not with traditional Oreos; you can substitute gluten‑free chocolate cookies for a safe version.
Nutrition Facts
per serving
280
Calories
5g
Protein
22g
Carbs
18g
Fat
Taste Profile
Creamy chocolate sweetness with a buttery finish
Ingredient Substitutions
Don't have an ingredient? Try these alternatives
Slightly less fat, keep the texture as close as possible.
Will change flavor slightly but maintain crunch.
Recipe Variations
Try these delicious twists on the original
Spicy Version
Add a pinch of cayenne and a drizzle of chocolate chili sauce for an unexpected kick.
Mediterranean Style
Fold in crumbled feta and a few chopped pistachios for a savory twist.
Common Mistakes to Avoid
Learn from others' mistakes for perfect results
- Over‑mixing the filling, which makes it dense.
- Using hot butter for the crust, causing soggy base.
- Skipping the chill time, resulting in a runny texture.
Meal Prep & Storage
Make Ahead Tips
The crust can be prepared a day ahead and kept refrigerated; add the filling just before chilling for best texture.
Leftover Ideas
Keep leftovers sealed and chill; enjoy within three days, or layer over ice cream for a quick sundae.
Perfect Pairings
Serve this with...
Cooking Timeline
Crush cookies and mix with melted butter for the crust.
Press crust into cups and chill briefly.
Blend cream cheese, sugar, vanilla; fold in whipped cream.
Fill cups, smooth tops, and refrigerate to set.
Add garnish and serve chilled.
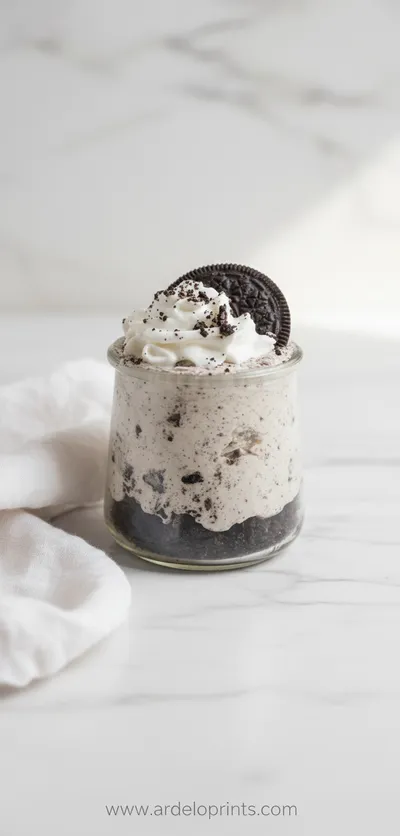
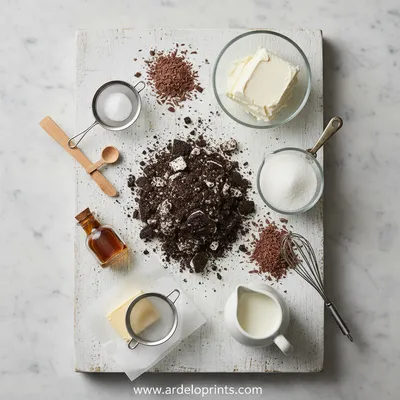
Oreo No-Bake Cheesecake Cups
These Oreo No-Bake Cheesecake Cups are a quick, creamy indulgence that feels like a gentle hug from the kitchen. The buttery crust, crumbled Oreo, and smooth cheesecake filling create a quiet celebration of texture and sweet nostalgia.
Timing
Prep Time
15 Minutes
Cook Time
0 Minutes
Total Time
15 Minutes
Recipe Details
Ingredients
Crust
-
01
2 cups Oreo cookies, crushed
-
02
3 tbsp melted butter
Filling
-
01
8 oz cream cheese, softened
-
02
1/3 cup powdered sugar
-
03
1 tsp vanilla extract
-
04
1 cup heavy cream, lightly whipped
-
05
Optional: 2 tbsp cocoa powder for extra chocolate depth
Garnish
-
01
Whole Oreo cookies or chocolate shavings
Instructions
Crush the Oreos in a zip‑top bag or food processor until fine; stir in melted butter until the mixture feels like wet sand.
Press the crumb mixture evenly into the bottom of each serving cup, creating a firm base.
In a bowl, beat softened cream cheese with powdered sugar and vanilla until smooth; gently fold in the whipped cream until fully incorporated.
Spoon the creamy filling over the crusts, smoothing the tops; refrigerate for at least 2 hours until set.
Before serving, top each cup with a whole Oreo or a sprinkle of chocolate shavings for visual appeal.
Notes & Tips
-
1
Make sure the butter is not too hot when mixing with the crumbs; it should just meld them together.
-
2
For a lighter version, substitute half of the heavy cream with Greek yogurt.
-
3
If you prefer a firmer texture, add a tablespoon of melted chocolate to the filling.
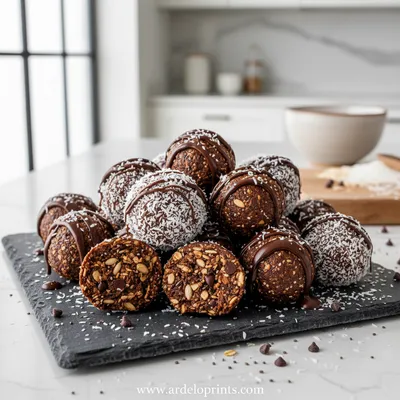 Snacks
Chocolate Coconut Energy Balls Recipe
Healthy no-bake snacks combining rich chocolate flavor with coconut goodness for quick energy boosts.
Tools You'll Need
-
Food processor or zip‑top bag and rolling pin
-
Small serving cups
-
Mixing bowl
-
Hand mixer or whisk
-
Spatula
Must-Know Tips
-
Do not over‑mix the filling; it stays airy.
-
Press the crust firmly, but not so hard that it becomes dense.
-
Taste the filling before chilling; adjust sweetness if needed.
Professional Secrets
-
Room temperature cream cheese blends without lumps.
-
Whipping the cream just until soft peaks keeps the texture light.
-
A brief chill of the crust before adding filling prevents sogginess.

Recipe by
Mason Cole“Sweet cravings are my specialty! I turn sugar, chocolate, and imagination into pure dessert magic.” 🍰✨
Get Delicious Recipes Weekly
Join 25,000+ home cooks getting our best recipes straight to their inbox.
Free forever • No spam • Unsubscribe anytime